


Updated on: 2026-04-27
You can upgrade the look and feel of your bike with CBR600RR fairings. Good fit and finish can reduce flutter, help cover worn areas, and protect vulnerable surfaces. Choosing the right material also affects weight, durability, and how easy the parts are to install. If you plan the work step by step, you can avoid common alignment issues and keep the front end looking sharp.
Table of Contents
Product Spotlight: CBR600RR fairings that look factory and feel precise
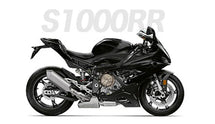
CBR600RR fairings are one of the fastest ways to refresh your sportbike without changing the core ride. Riders often notice the front end first. When the panels sit straight, the bike looks focused and modern, and the lines flow from the nose to the tank area. The good news is that you do not need to guess what works. You can choose fairings that are made for the Honda CBR600RR style and then focus on fit, finish, and installation quality.
At NewFairings.co.uk, you can browse Honda-specific options and compare styles. If your goal is a direct match for the CBR600RR look, start with this collection: CBR600RR fairings collection. If you want alternatives across the CBR600 series, these links are also helpful: Honda motorcycle fairings and CBR1000RR fairings.
When you shop, look beyond the color. Fitment matters most for day-to-day riding. Panels that align well around the windscreen, side edges, and mounting points can reduce annoying gaps. That also helps the bike feel more stable at speed because the airflow is interrupted in a predictable way. Even if you are not chasing track performance, clean panel gaps and secure mounts make the bike look cared for.
Material is the next big factor. Many riders choose fiberglass or composite-style fairings because they are lightweight enough for quick handling, yet strong enough for regular use. Fiberglass can also be forgiving during installation when you align tabs and fasteners. If you ride often, you may also care about how the fairing handles minor impacts and road vibration.
Sharp lines, panel gaps, and front-end alignment cues
What to check before you buy
Before you order, confirm the model year compatibility. Even within the same bike family, small design changes can affect mounting points and edge profiles. Also check the mounting style. Some fairings are designed for OEM-style hardware, while others work best with specific clips or fasteners. If you already have brackets or fasteners, note what you plan to reuse.
Next, think about how you will finish the fairings. If you plan to keep the look close to stock, pay attention to surface readiness and how evenly the panels are prepared. If you want your own paint scheme, consider how the material responds to sanding, priming, and layering. A smooth surface is easier to paint and easier to keep looking clean.
Quick benefit checklist
Improved appearance with cleaner panel lines.
Better coverage for worn or weathered areas.
More confident mounting for daily riding comfort.
Custom look potential through paint or decal work.
Step-by-Step How-To: install CBR600RR fairings with fewer alignment headaches
Installing fairings can feel intimidating at first, but it becomes simple when you work in a clean, logical order. The goal is to remove panels carefully, keep hardware organised, and align each piece before you tighten everything fully. Below is a practical approach that works for many CBR600RR fairings installations.
Prepare your workspace. Use a flat surface and good lighting. Keep a tray for screws and bolts so nothing rolls away. Lay a soft cloth where parts can rest.
Disconnect only what you must. If your fairings cover wiring near the bars or headstock, gently open access points. Do not force connectors.
Remove panels in layers. Start with outer pieces that are easiest to access. Move toward inner panels only when the outer mounts are fully free.
Label hardware. Use small cups or bags and label them by location. This saves time later and prevents wrong bolt lengths.
Test-fit the new fairing panels without tightening. Place the panel into its mounting points and check the alignment along the edges. Look for even spacing around the windscreen and side lines.
Align tabs and mounting holes. If a hole is slightly off, do not force the bolt. Reposition the panel until the mounting points line up naturally.
Tighten gradually. Start with light hand-tightening on each fastener. Then return and tighten once the entire panel sits correctly.
Re-check the edges and seams. Run your fingers along the joins. Confirm that nothing rubs against the fork area or moves when you turn the bars.
Reconnect wiring and test movement. Turn the steering lock to lock if your bike allows it safely. Ensure cables and hoses have enough clearance.
Final inspection. After everything is mounted, stand back and confirm the front profile looks straight and cohesive.
Many installation problems come from skipping the test-fit stage. If you tighten too early, the fairing can pull itself out of alignment, which creates gaps. A quick test-fit prevents that.
Tools that make the job easier
You do not need a workshop, but having the right basic tools helps. A set of metric hex keys, a proper screwdriver set, and a soft trim removal approach for any clips can reduce damage. A torque setting is not mandatory for every bolt, but consistent tightening helps keep the panels stable.
Stepwise alignment checks and seam spacing visualization
Personal Experience: how a careful install changed how my bike looked
I remember the first time I ordered replacement fairings for my own sportbike. I focused so much on the color that I rushed the fit. When I finally stepped back, I could see a small uneven gap near the front edge. It was not dramatic, but it pulled my eye every time I walked past the bike.
The next weekend, I took the panels off again and reinstalled them with a slower routine. I laid out every screw by location, then test-fit each piece before tightening. I also checked alignment at the seams and around the windscreen area, not just at the mounting holes. The difference was huge. The front profile looked straighter, and the bike seemed more “together,” like the lines were meant to be there.
That experience taught me something important: fairings are not just cosmetic. When the fit is correct, the bike feels more precise in daily use. Even on short rides, you notice how the windscreen area and side panels sit with less movement and fewer annoying adjustments later.
If you want to explore other Honda CBR options for parts compatibility, you can also compare: CBR600F2 fairings and CBR600F3 fairings. These collections are useful when you are researching styles and mounting approaches across the CBR line.
Summary & Recommendations
CBR600RR fairings are a smart upgrade when you want a sharper front end, better coverage, and a more refined overall look. Start by choosing fairings designed for the CBR600RR style, then focus on fitment, material, and finish readiness. When you install, test-fit first and tighten gradually. That one habit prevents most alignment problems.
Here are simple recommendations to keep your project smooth:
Buy from a clear, model-focused collection so fitment is less guesswork. Start with CBR600RR fairings collection.
Organise hardware and label parts during removal. It reduces install time and errors.
Test-fit each panel before final tightening and check seam spacing.
Inspect steering clearance and cable routing after installation.
If you are comparing options, visit Honda motorcycle fairings for a broader look across the lineup. The right set of fairings can make your bike feel like a fresh build without major mechanical changes.
Care tips to keep your fairings looking clean
After installation, keep cleaning gentle. Use mild soap and soft cloths to protect the surface. Avoid harsh abrasives that can dull the finish. If you ride in wet conditions, rinse road grime promptly and dry the panels to reduce residue buildup.
Q&A
How do I confirm that my CBR600RR fairings match my exact bike?
Start with your bike’s model and year, and then compare that information with the fitment details from the fairing listing. If a listing offers multiple variants, choose the one that matches your steering and front-end layout. When in doubt, cross-check mounting style and edge profiles. Keeping your removed original panels as reference also helps.
Do I need professional tools to install sportbike fairings?
Most riders can install fairings using basic metric tools such as hex keys and screwdrivers. The key is careful handling and organisation. Test-fitting before tightening is more important than having expensive equipment. If your bike has any stubborn clips or hardware, use gentle removal methods to avoid breaking mounts.
What is the biggest mistake people make when installing fairings?
The most common mistake is tightening fasteners too early. Panels can shift slightly when you tighten one side first, which leads to uneven seams and gaps. Instead, place each panel, check alignment, and then hand-tighten all fasteners before returning to fully tighten them.
Can I paint or decal CBR600RR fairings after installation?
Yes, many riders paint or decal fairings after preparing the surface. The best results come from proper cleaning, sanding where needed, priming for adhesion, and then applying paint or decals. If you want a high-quality finish, take time with prep and cure steps so the surface stays smooth and durable.
Disclaimer: This article is for general information only. Always follow the manufacturer’s instructions that come with your specific fairings and hardware. If you are unsure about any step, consult a qualified motorcycle technician. Installation quality, ride conditions, and part compatibility can affect safety and performance.
New Fairings, Not Used Fairings.